Blogger Tips and TricksFeatured Content Slider

Tuesday, July 16, 2013

Blackberry Marble Cheesecake

Blackberry Marble Cheesecake

by Sweet Yarns

Ingredients

    Blackberry Sauce
    • 2 cups fresh blackberries
    • 3/4 cup water
    • 1/2 cup sugar
    • 3 tbsp. cornstarch
    • 1 tbsp. raspberry brandy (optional)
    Crust
    • 1 1/4 cups graham cracker crumbs
    • 1/4 sugar
    • 1/3 cup margarine or butter, melted
    Filling
    • 3 (8oz.) packages cream cheese, softened
    • 1 (14oz.) condensed milk
    • 3 eggs
    • 1/4 lemon juice

    Instructions

    Blackberry Sauce:

    In a small saucepan, bring blackberries and water to a boil. Reduce heat; simmer for 5 minutes. Press mixture through a strainer; discard seeds. Cool.

    Combine sugar and cornstarch; stir in blackberry puree until smooth. Bring to a boil; cook and stir for 2 minutes or until thickened.Cool. Add raspberry brandy. Reserve 1/3 cup sauce; cool. Chill remaining sauce.

    Crust:

    Combine crumbs, sugar and margarine; press onto bottom of 9-inch springform pan.

    Filling:

    In mixer bowl, beat cream cheese until fluffy. Beat in condensed milk until smooth. Add eggs and lemon juice; mix well. Spoon half the batter into prepared pan. Spoon half the reserved strawberry sauce in small amounts over batter. Repeat, ending with sauce. Using a knife, cut through batter for marble effect.

    Bake 50 minutes or until center is set. Cool. Chill.

    Serve with chilled blackberry sauce. Refrigerate leftovers.

    Powered by Recipage

    Thursday, February 14, 2013

    Bloglovin

    <a href="http://www.bloglovin.com/blog/3593742/?claim=xyrsg8aegkk">Follow my blog with Bloglovin</a>
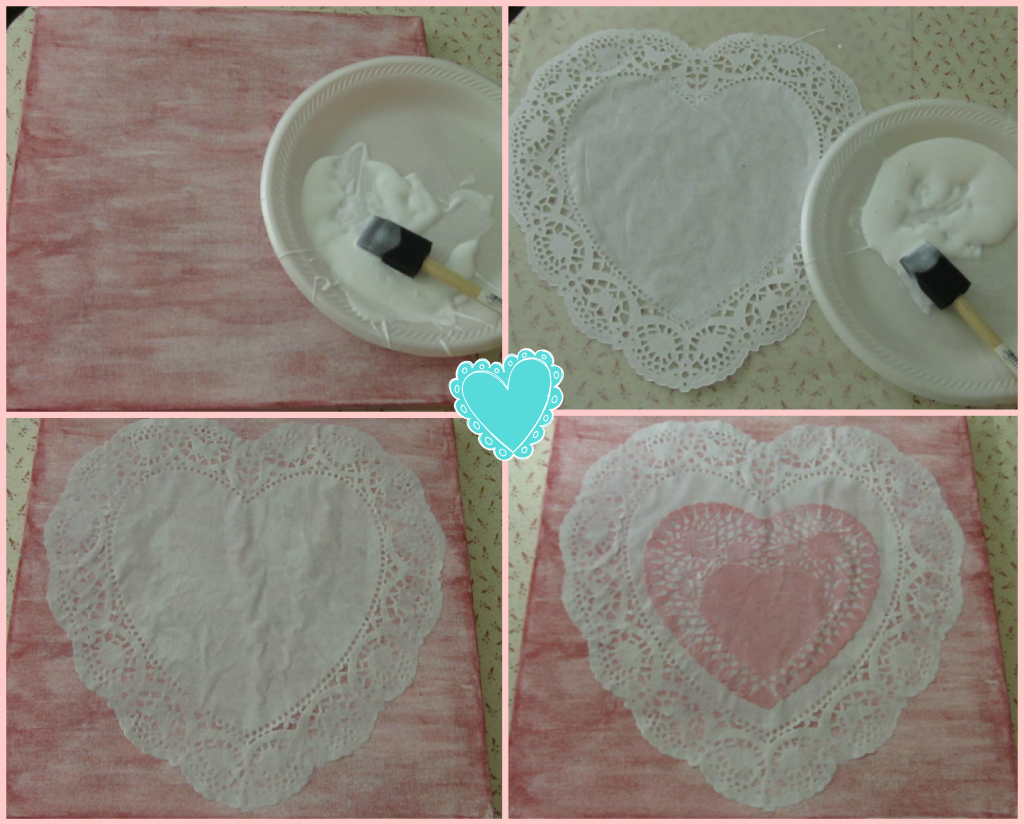
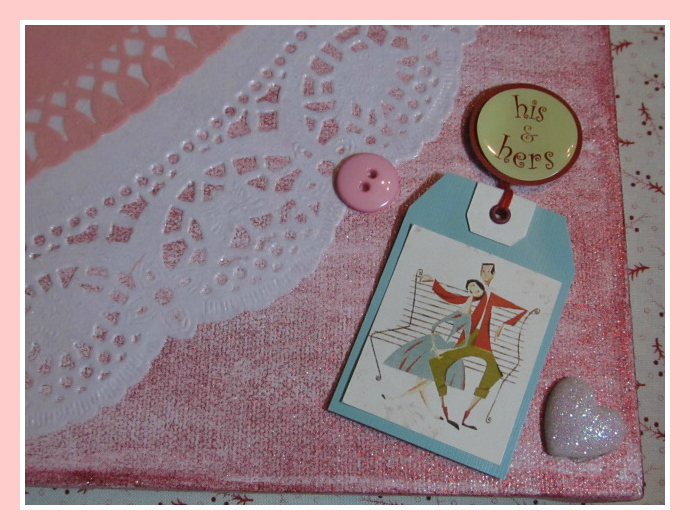
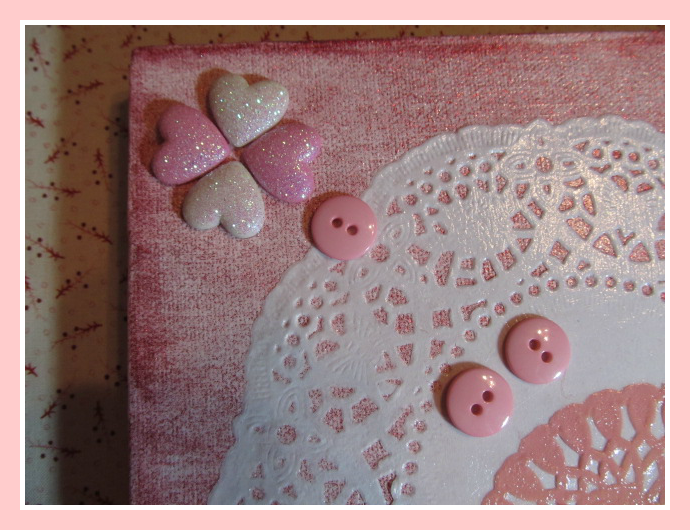
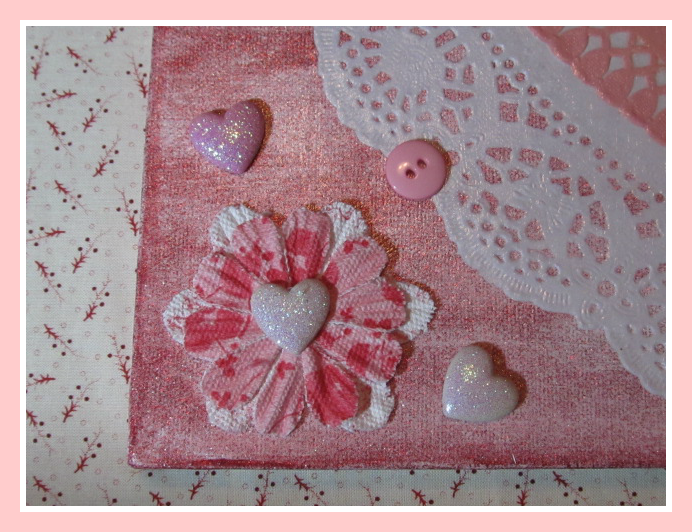
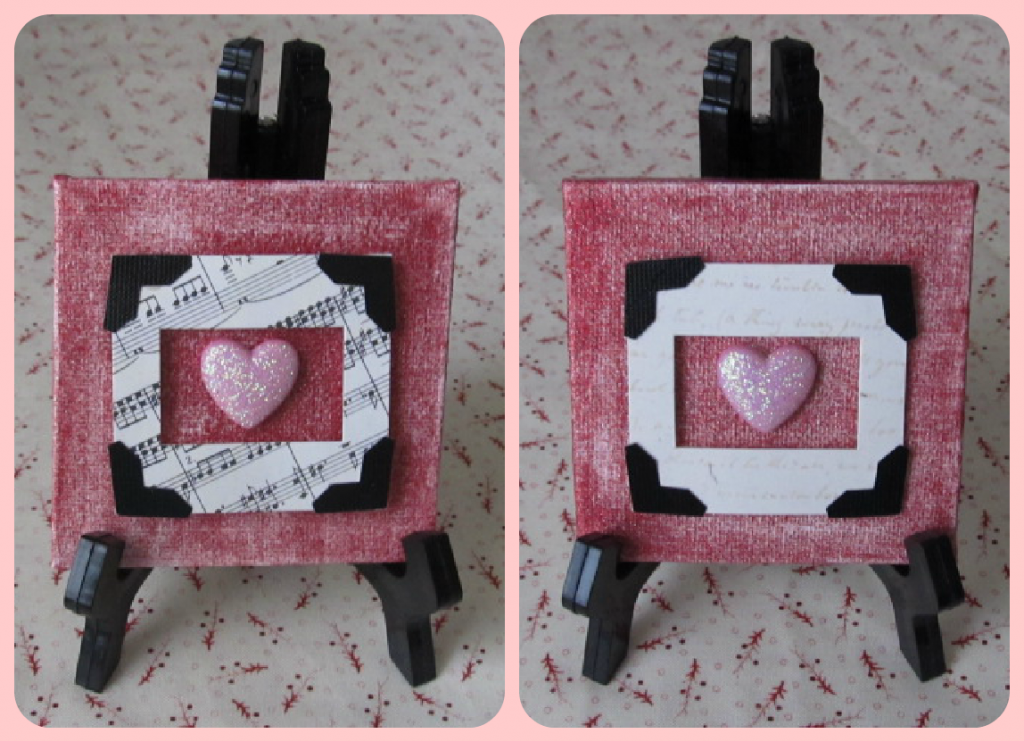
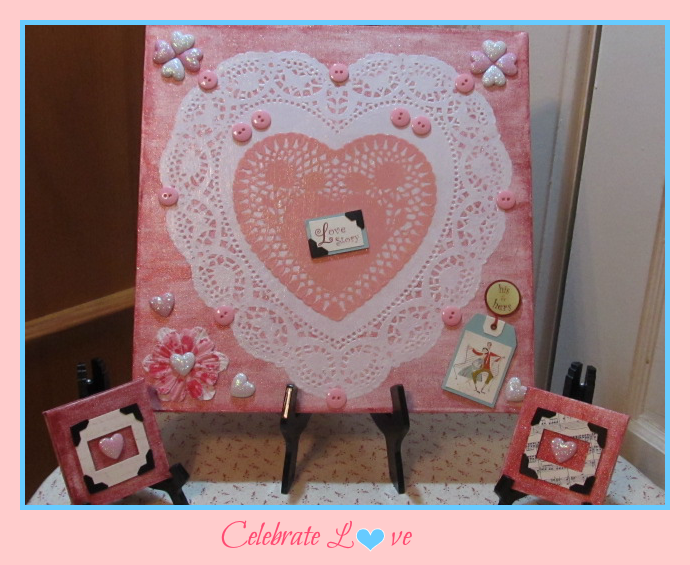
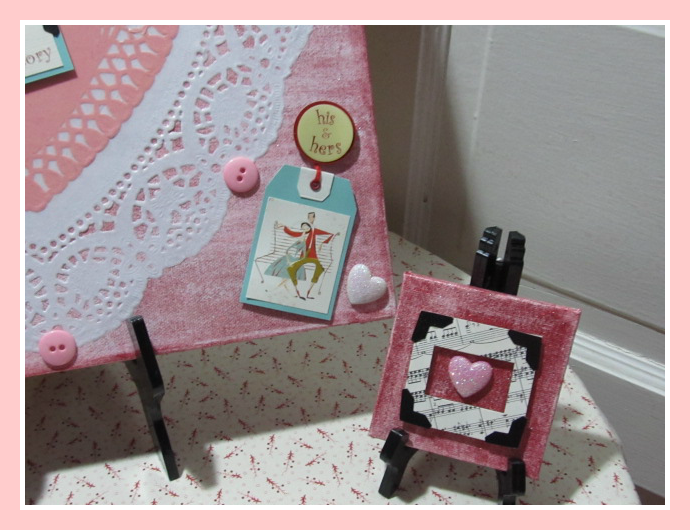
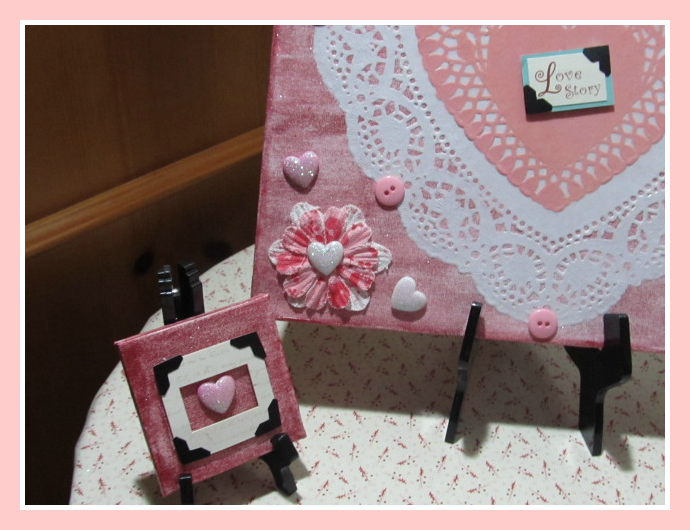
    Canvas

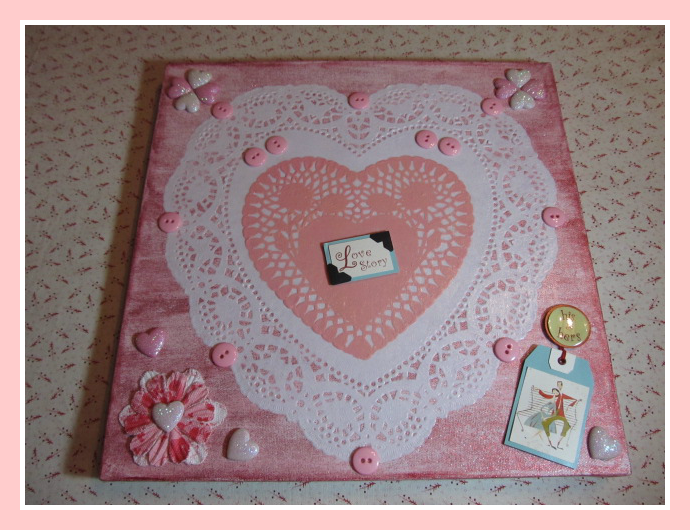
    Happy Valentine's Day!!! I wanted to create something fun for Valentine's Day. I found an opened 12" x 12" canvas at my local Thrift shop for $1.99. What a deal!!! I thought I create a Mixed Media Collage using Paper Doilies and various types of Embellishments.
    Let's begin by gathering the following materials.
    Materials:
    • 12" x 12" Stretched Canvas
    • 1 - 10" White Paper Doily
    • 1 - 6" Pink Paper Doily
    • Pink and White Adhesive Glitter Shape Hearts
    • Recollections Floral Embellishments, purchased at Michael's
    • Craft Essentials 3-D Embellishments - Love Story, purchased at Jo-Ann's Fabrics
    • 5/8" Pink Buttons
    • Hot Glue Gun
    • Gesso Canvas Primer
    • Folk Extreme Glitter Acrylic Paint - Red
    • Mod Podge - Gloss Finish
    • Foam Brush
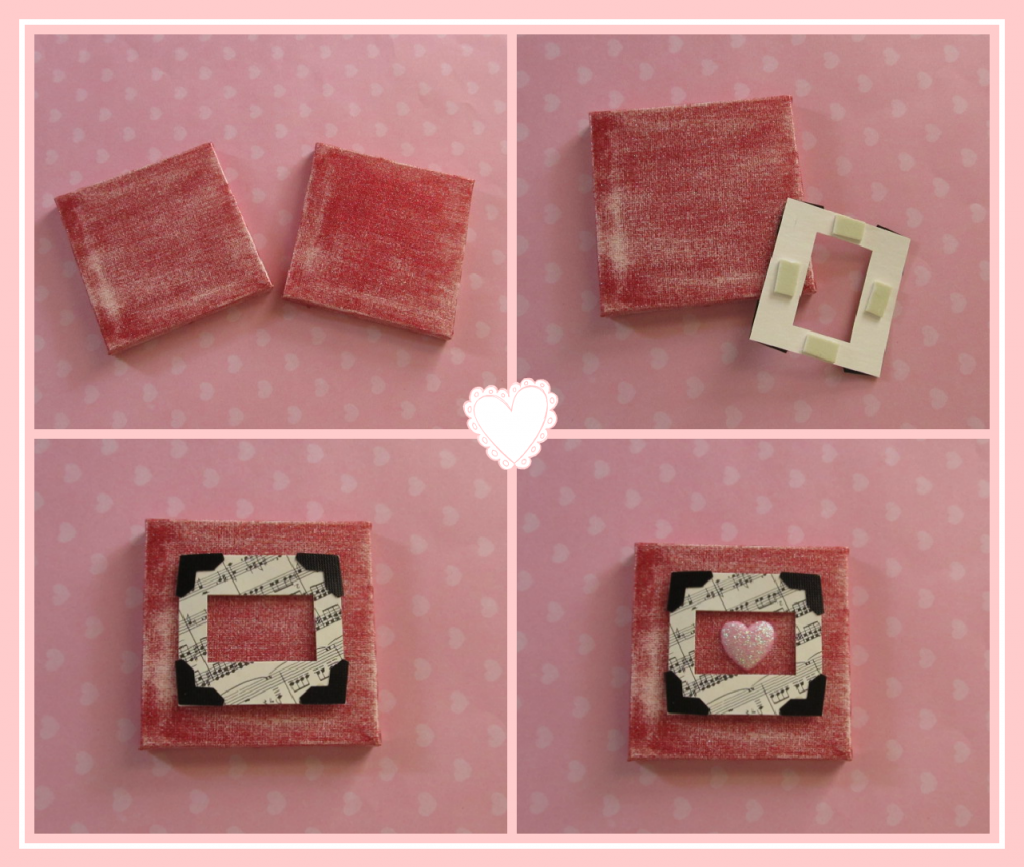
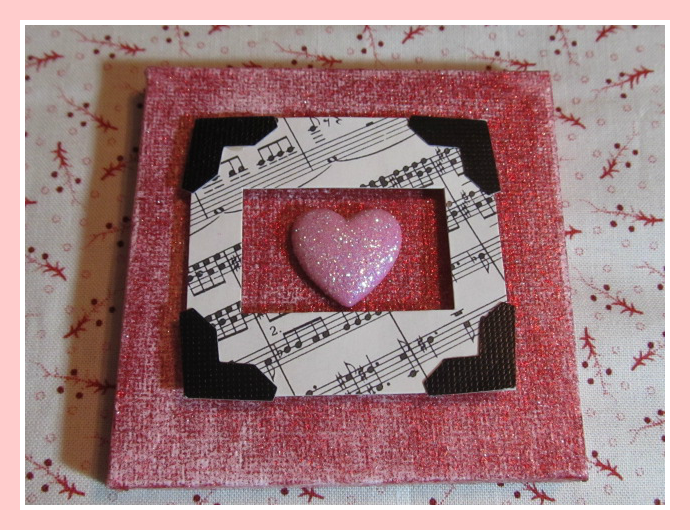
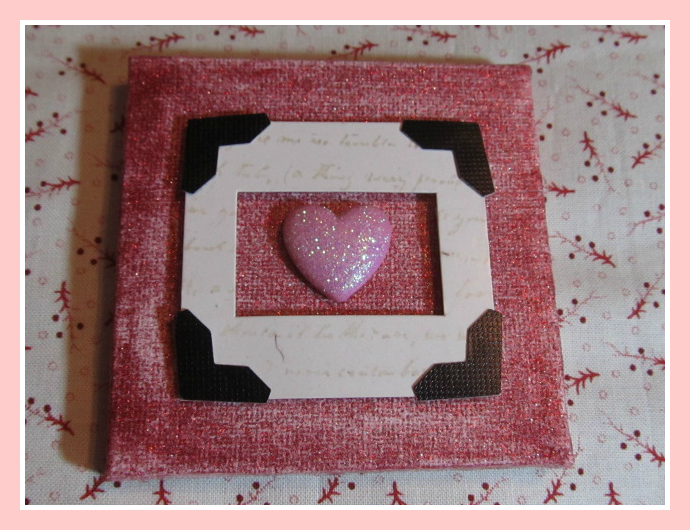
    • 2 3" x 3" canvas - optional
    Directions:
    Apply one coat of Gesso Canvas Primer all over the canvas, let dry completely. Apply two coats of the Extreme Glitter paint. Let dry between coats.
    Apply a light coat of Mod Podge to the canvas center, where the large doily will be placed. Add your 10" white doily, smoothing wrinkles with your fingers. Let it dry for 15-20 minutes. Apply a second coat of Mod Podge all over the doily. Let it dry for about 1/2 hour. Add another light coat to the center of your 10" white doily Apply your 6" pink doily; again smoothing wrinkles as before. Let it dry for 15-20 minutes. Apply another coat of Mod Podge; let it dry for about 1/2 hour. Apply 1-2 final coats of Mod Podge all over the entire canvas. Let dry between coats. Note: Your wrinkles will eventually disappear as more coats of Mod Podge are applied.
    Begin adding your embellishments. Most of the embellishments I choose came with an adhesive backing. However, I added a bit of hot glue the back to obtain a permanent bond. I started by adding the pink buttons to the white doily. I applied one of the 3-D Love Story embellishments and a pink heart to the canvas right lower corner.
    I then added 4 hearts; 2 of each color to the canvas left and right top corners.
    I attached 2 flower embellishments, overlapping each other to the canvas left lower corner; placing a white heart in the middle and two more hearts on the left and right sides of the flower.
    Lastly, I applied one more 3-D Love Story embellishment to the center of the pink doily.
    Here is the canvas after all the embellishments were added.
    I stumbled upon these cute small canvases while shopping at ACMoore and decided they would complement the large one. I applied two coats of the Extreme Glitter paint and added 3-D and Hearts embellishments.
    I enjoyed creating this project as it allowed me to choose and add different components to a plain canvas; resulting in a fun Collage.
    Happy Valentine's Day!!!
    Linking to:
    Today's Creative Blog debbie-debbiedoos

    Monday, February 11, 2013

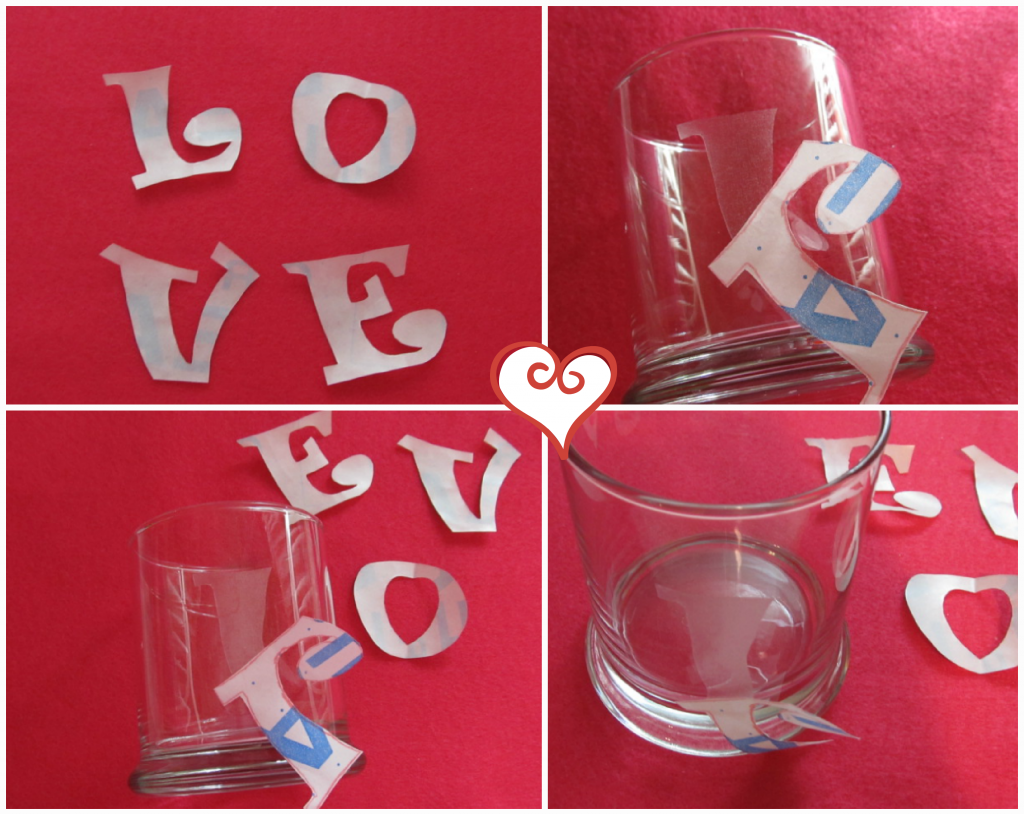
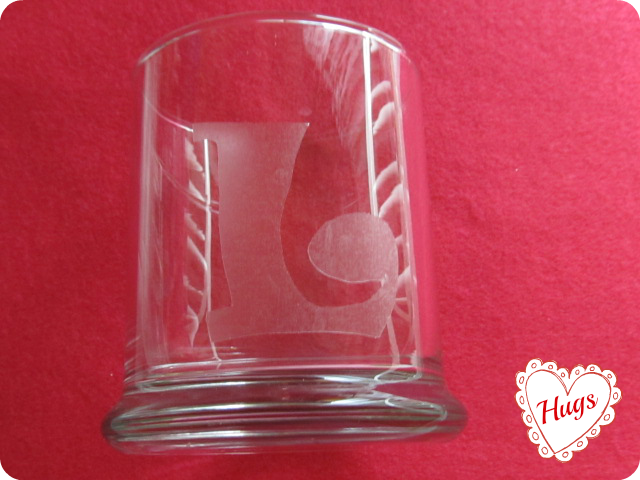
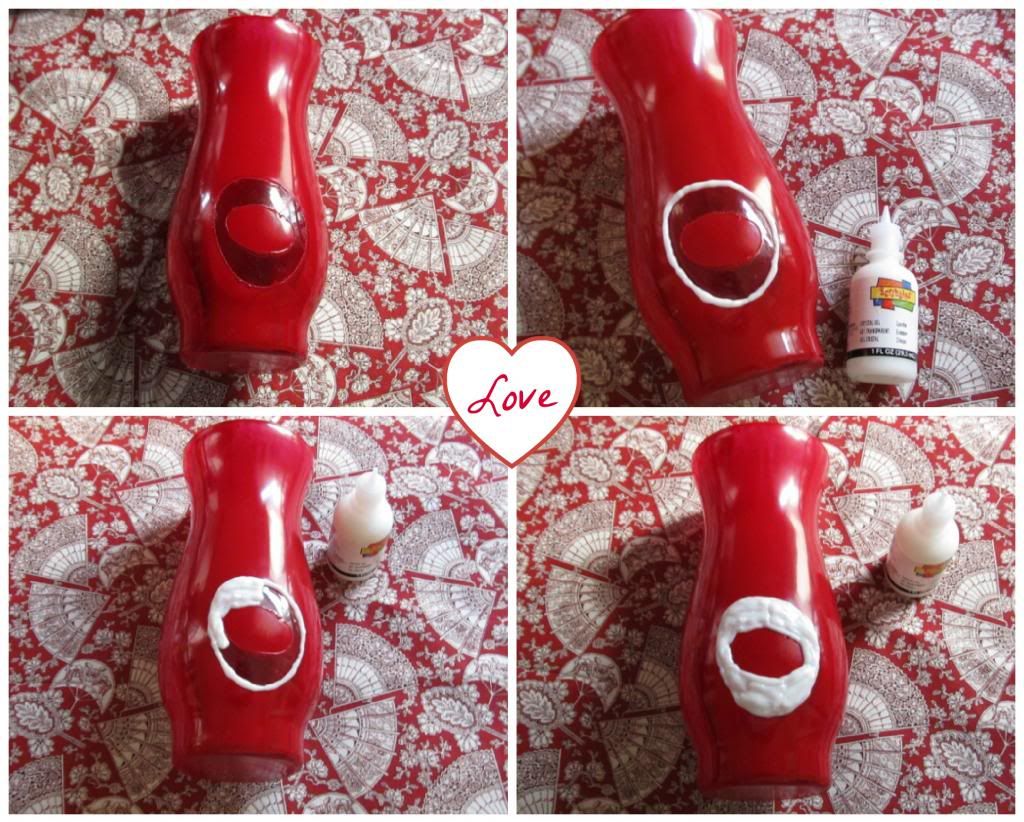
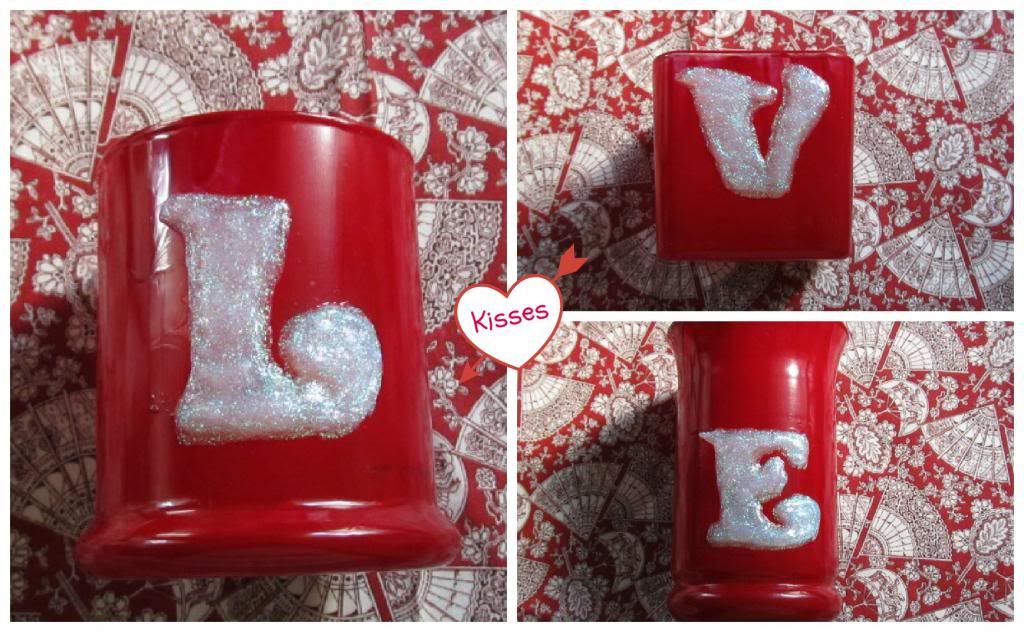
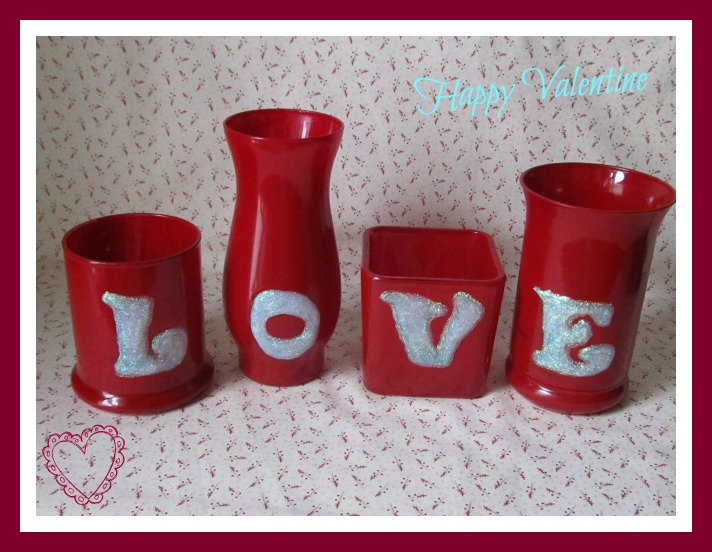
    Puffy ValentineVases


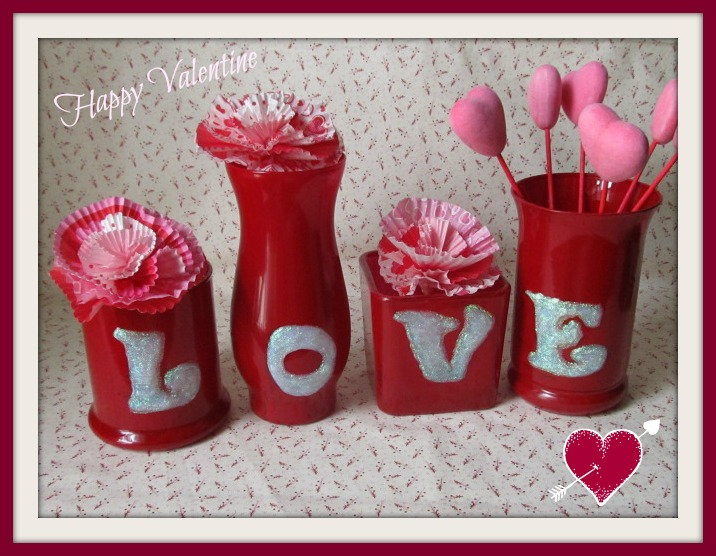
    Valentine's day decor will not be complete without one or more vases you can fill with fresh, faux flowers or any other fillers. My Love vases are a low-cost project, created simply from four different glass vases from Dollar Tree and paints I had in my craft stash.
    Lets begin by gathering the following materials.
    Materials:
    • 4 glass vases. I choose four different shapes.
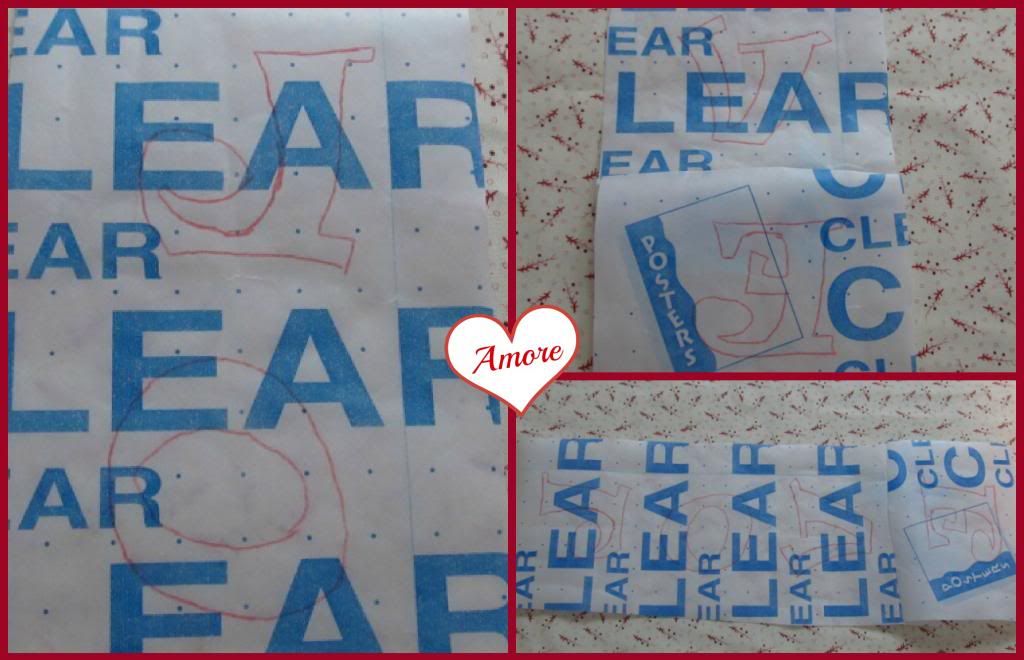
    • Clear Contact Paper
    • Tracing Paper
    • Krylon Spray Paint - Cherry Red
    • Scribbles Dimensional Fabric Paint - Sparkle
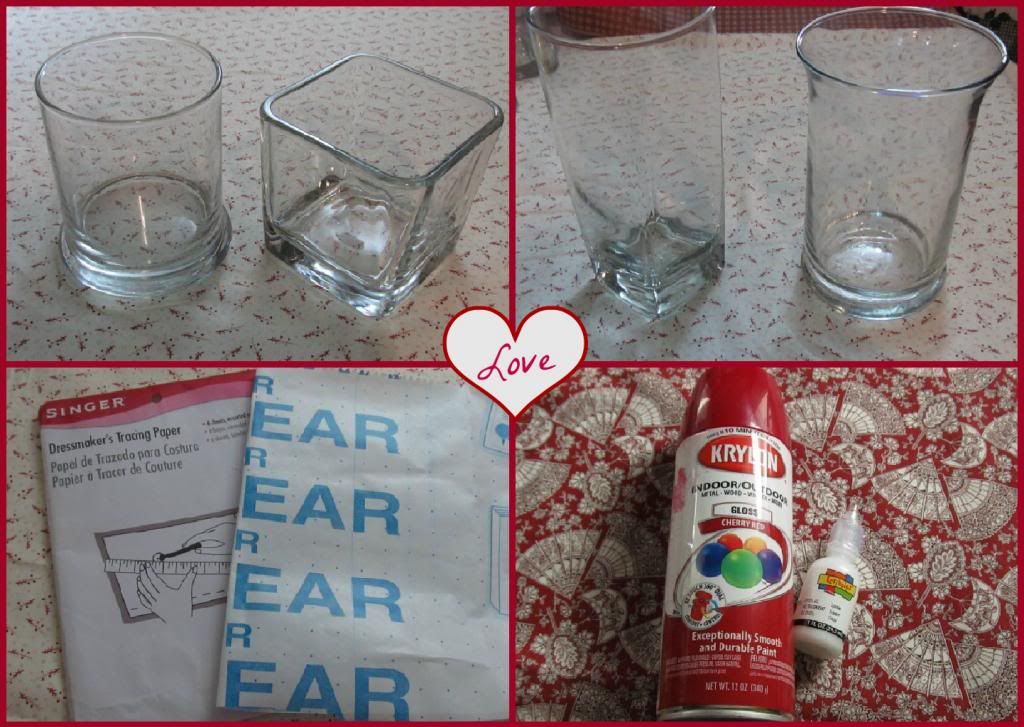
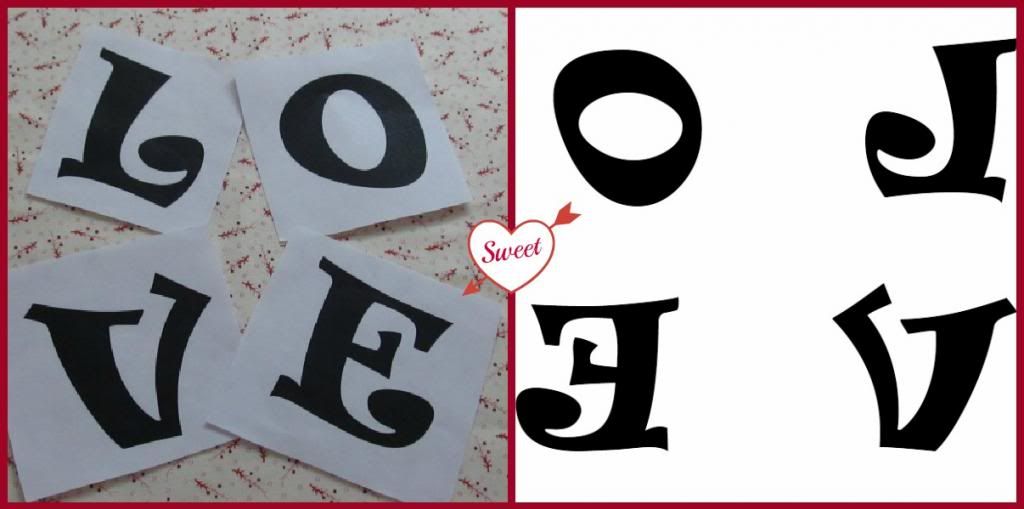
    • Letters - I created mine in Word using Font Name: RAVIE, Font Size: 175, printed on reverse order.
    • Scissors
    • Newspapers
    • Rubbing Alcohol
    • Paper towels
    • X-Acto Knife
    Directions:
    Using the tracing paper, begin tracing your letters onto the contact paper. Make sure your letters are placed in Reversed Order, prior to tracing.
    Wash and dry your vases. Wipe them using rubbing alcohol and paper towels. Let them dry completely. Cut your letters following the tracing lines. Remove the backing paper and firmly apply letters to each vase.
    Using your fingers, rub each letter to make sure the edges are affix to the vase's surface.
    Cover your working area with plenty of newspapers or drop cloth. In a well ventilated area; paint your vases using the Krylon Spray paint. I gave my vases two coats. Let each coat dry for at least one hour. Let vases dry overnight before adding your Fabric Paint. Remove the letters from all the vases. If any spray paint bled under your letters, carefully remove it with a X-Acto knife. Begin decorating your vases using the Scribbles Fabric Paint. Outline and fill each letter. Make sure the exposed glass area is covered with paint. Let dry at least 4 hours. I gave my letters to coats of fabric paint to double up the Puffiness.
    I just love how this fabric Paint dries, giving my project that awesome Puffiness effect. The plain glass vases I started with now have a super dimensional finish.
    I hope you enjoy this tutorial and add a few bottles of Fabric Paint to your craft stash; you will not regret it....

    Monday, January 28, 2013